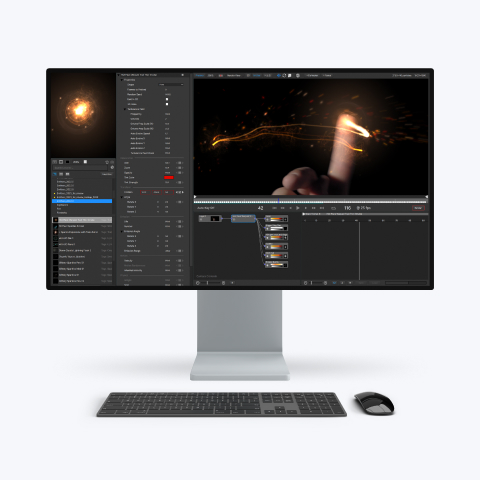
Making an emitter go around something "3D" 27 May 00
Sometimes you may want an emitter to go around some object in "3D" -- start in front of it, move behind it, then move
back in front of it again. An example of this is the "magic guy" movie in the gallery:

In this animation magic sparkles appear to swirl around his body, spiraling around him a few times. This is
really pretty easy to do -- we'll go through a simpler example here, making sparkles go around a pillar.
First, we need an image of something to go around. As I said I'll use a pillar. I rendered it with an alpha
channel so I can easily mask it (make the non-pillar parts of the image transparent). If you don't have an image
with alpha channel, you'll need to isolate the object in your image on a solid-colored background so you can
use Illusion's "transparent color" feature to mask the object. Alpha-channel is the best solution though.
Click here to download the pillar image so you can follow along.
Now start Illusion (or create a new project if it's already running). Create a new layer -- we'll need 2 layers
in order to make the sparkles go behind the pillar. You create a layer by R-clicking in the Layers Window
and selecting New Layer. Name it what you want. Load the pillar image into the top layer (the one that is at
the top of the Layers Window). Do this by either R-clicking the layer and selecting Background Image or by
double-clicking the empty thumbnail image area.
We'll need to enable transparency for this layer or we'll never see the particles that are supposed to go behind
the pillar. R-click on the layer and select Transparency. In the dialog that opens check the "use existing image
transparency" button, then close the dialog by clicking OK. Here's what the Layers Window should look like:

Now we're ready to add our sparkles. I'm going to use the "Basic Sparkle" emitter from the
Impulse Sparkles library. You can use a different
emitter if you want to. Just add the emitter to layer 1 (the top layer) at frame 1. Add it anywhere, because we're
going to use the "Record Position" function to draw the emitter's path. R-click on the stage emitter then select
Record Position and click OK. The first L-click will start recording, and the second L-click will stop it. Let's
make the sparkles start to the left of the pillar, cross in front of it, then spiral up it a few times before moving
away to the right. You'll need to draw the path of the emitter as it "goes around" the pillar, but it won't be going
behind the pillar yet -- it'll be "on top" of the pillar for now. Go ahead and record it. Here's what I did:

I noticed that when the particle crossed the pillar, the colors "washed out" to white. That's because the particles
are flagged as "intense" and that's what intense particles do -- they add to white. Since I want the colors to remain
instead of going "white", I edited the emitter properties and checked the "preserve color" particle option.
Now we're ready to do the important part: getting the emitter to go behind the pillar. Before we do though, it would
be best to make sure that the emitter looks the way you want it to -- it will be difficult to make adjustments
later. You'll understand why soon.
Move to the frame at which the emitter should first go behind the pillar. In this example, I use the frame at which
the curve "peaks". A picture should help:

Make note of this frame number (in my case it's frame 42), then move to the frame at which the emitter should move back
in front of the emitter -- the "peak" at the other side of the curve:

This is frame 75 in my case. Go through the remainder of the path and note the frames at which these transitions from
front to back (and back to front) take place. In my case they are 42, 75, 110, 140. We'll use these in a minute. Now
COPY the emitter, change to the other layer (Layer 0, the one under the layer with the pillar image on it) and PASTE it.
Make sure you're at frame 1 when you paste. You should now have the same emitter on both layers. Now we'll use the list of
frame numbers that we made.
Select Layer 1 (the top layer, with the pillar image). Select the Number property in the Hierarchy Window and move to the
first frame in your list of transition frames (in my case 42). At frame 42, step the Number property (in the Graph Window)
down to 0. Then at the next frame in your list (75 for me) step back up to whatever the Number value was before you stepped
down. Here's what the graph should look like:

What we've just done is "turn off" the emitter on top during this time, because the emitter on the other layer (behind the
pillar) will be "turned on" during these frames, and will be off at other times. Let's do that now. Select the emitter on
the other layer (Layer 0, bottom layer) and make its Number graph the opposite of what you just did for the "front" emitter.
That means in my case the emitter Number graph starts at 0, jumps up to 310% at frame 42, then jumps back down to 0 at frame
75. The idea is to have only one of the emitters "on" at a time. Here's the graph for this emitter:

If you watch the playback, you'll see the emitter appear to go behind the pillar now! (Remember to make sure transparency
is enabled for the layer with the pillar image -- the "T" icon does not have a red line through it.)
Do the same thing for
the remaining frame numbers in your list, making sure the emitter in front of the pillar is off when the sparkles should be
behind the pillar, and the emitter behind the pillar is off when the sparkles should be in front. My graphs for both
emitters:


That's all there is to it. In summary: Make a copy of the emitter on the "behind" layer, then turn the emitters "off" when the other
one is "on".
Just for fun I increased the Life of the emitters (had to change properties in both emitters, which is why I said earlier to make
changes before copying), and reduced the Velocity and Weight properties so I could see the sparkles going around the pillar:

The project files: 
Alan Lorence 27 May 00